A personal family project
For My Father
A memorial urn & keepsake box
A personal build made to hold my father’s ashes and keepsakes, bringing Brazilian walnut, padauk, spalted maple and walnut together in one memory box.
20 curated photos · Finished piece & build progress
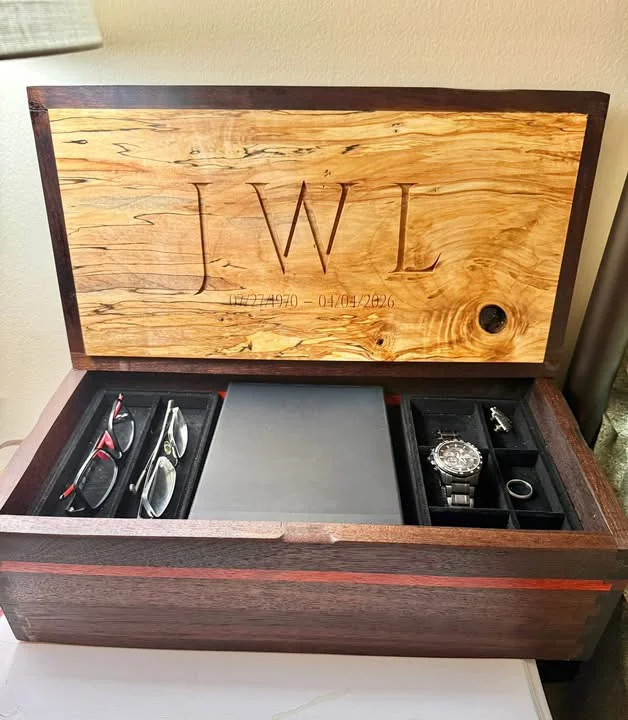
The finished piece
A place for remembrance.
The completed urn and keepsake box, its contrasting woods and the personal details. Select any photograph to explore it at a larger size.
The finished tribute
The completed urn and memory box, with its personalized lid, contrasting woods and padauk accent.
Grain & contrast
An angled view of the finished case shows its dark grain, bright accent line and corner joinery.
The finished case
A closer view of the finished box and the accent running around its sides.
Personal details
The engraved panel adds a personal detail to a piece made in remembrance.
The spalted maple lid
The unengraved face of the spalted maple lid shows its natural pattern against the dark case.
Inside & out
The open case shows the continuous accent line inside and out, with the finished corner joints visible.
The story behind the work
About this project.
I made this urn and memory box for my father. It holds his ashes and keepsakes—a place for remembrance, made by hand.
The piece brings together Brazilian walnut, padauk, spalted maple and walnut. Dark grain, a warm accent line and the naturally patterned maple give each part of the box its own character. The engraved details make it personal.
The photographs below follow the work from the starting boards and accent glue-ups through corner joinery, fitting the base and panels, and the final surface details. This is a personal project rather than a stock product.
Made by John for his father—not a stock item or a piece intended to be copied. The photographs preserve the story of this individual build.
From the workbench
How the box came together.
Follow the steps from the starting boards and accent glue-ups to the joinery, fitted panels and final surface details.
01 · Starting with the wood
The starting stock laid out on the bench before the box components take shape.
02 · Planning the contrast
Dark boards and bright padauk strips are arranged alongside the box sketch.
03 · The spalted panel
The natural spalting in the maple brings a distinct character to the light panel.
04 · Gluing the accent
Clamps hold the contrasting strips together during glue-up.
05 · Preparing the sides
The joined panels show the narrow padauk line that will continue around the case.
06 · Laying out the case
The separate side components are arranged before they become the box.
07 · Checking the corners
A trial fit checks how the grain and accent meet at the corner.
08 · Shaping the joinery
A close view of a corner joint before the case is complete.
09 · Matching the joints
The joint components are laid together, with the accent line visible across the pieces.
10 · Fitting the base
The assembled sides surround the fitted wood base before the final surface work.
11 · Assembling the case
Clamps hold the assembled case while its joints and overall alignment are checked.
12 · Working the panel edge
A clamped close-up records another stage in preparing the panel and its edge.
13 · Recessed lid detail
A close view of the recessed detail along the case’s top edge, above the padauk accent.
14 · Final surface details
A close-up of the finished side shows the wood grain, dovetail corner and bright padauk accent.
Original photographs by John Carter. Six finished and detail views are followed by fourteen workshop photographs. Original framing, lettering and wood colors are preserved.
Built around your vision
Have a story of your own?
If you have a keepsake or memorial project in mind, tell John what you would like it to hold and the details that matter to you. Every piece starts with your own requirements.